As I said above if you have a computer with a sound card with microphone
input (all cards I know have such input) you only need a magnetic head to read
magnetic stripe cards. The head has to be chosen such that the size of the
track matches that of the magnetic stripe. I found that the size of the track
of a normal mono audio cassette player is a little bit smaller than required
but it works well. Using a stereo audio head is not recommended but it will
likely work if you use just one of the two tracks. I use a 1.5 meter long
twisted pair thin cable to connect the mono audio head to the microphone socket
using a mono jack connector. If one of the pins of the magnetic head is
connected to its case you should connect this pin to ground, which is the side
of the jack closer to the cable (rear part). Now you only need some mechanical
device to swipe the card, see my first reader
page for a particular design.
Some sound cards have a stereo socket for the mic
input, providing around +5v DC current in the middle connector (jack's ring),
although I've seen at least one card with the +5v output in the outer connector
(jack's tip), see here for
details. If you use a mono jack connector (tip and ring shorted together) then
this DC current is applied to the magnetic head and it might be enough to erase
magnetic stripes (it happened to me with one sound card, I erased accidentally
a couple of magnetic stripes while trying to read them), so you might consider
adding a capacitor (around 200 nF should be fine) in series with the head to
avoid this DC current. Of course you can use a stereo jack and leave the ring
(or the tip) open, but anyway it's a good practice to measure the voltage
before connecting the magnetic head to be sure there will be no DC current when
you connect the head.
To read data using my software you will need Linux running in your computer
with the sound card configured to be used. You will also need a C compiler, the
sox utility, a mixer (aumix, kmix,
gmix, xmixer, asmixer, ...) and the C shell, don't worry, all these utilities
are included in any Linux distribution. The software I wrote consists of a shell script (don't forget to activate the execution
permission, the download will remove it) and a C
program which you will have to compile (see source for instructions). Of
course you can develop your own program to read data using Windows (sox is
available for that platform), for example, but please don't ask me to do it. If
you do not have and do not want to install Linux (you don't know what you are
missing ;-) you still have the choice to run Linux on CD and use my programs,
see my page running Linux without installing it.
Actually I have a prepared 700 MB
Knoppix ISO image which has the source codes and the compiled binaries. See
the mentioned page for instructions.
Using the software
Once you have compiled the C program, put it in the execution path (can be
the current directory if you have it in your PATH environment variable) and
connect the magnetic head to the microphone input of the sound card, then you
just have to run the shell script and swipe the card. When you run the program
it waits for activity in the sound data flux, that is, a card swipe. When the
activity stops, the program starts decoding the bits, forming bytes and
checking parity and LRC. Swiping a card rises the sound level over noise and
that's the activity the program detects. After the swipe the script lets you
swipe again (in case the read out was unsuccessful) or exit.
The script tries to set the mixer settings of the sound card to the
appropriated values using the program aumix. If this utility is not installed
in your system or the script does not set the right values (channel names may
differ from card to card) you will have to set the mixer manually using your
favorite mixer. The required settings are to select the microphone channel as
the recording source and set its gain to maximum level. It may be also needed
to set the recording channel to maximum level. In case of doubt just rise all
channels to maximum level. If you have a speaker connected to the sound card
and the mixer properly configured you will hear data like in a modem. This is
very interesting because the sound greatly helps to position the head over the
track, the higher the sound the better position. It will also let you
distinguish between high and low density tracks, the former type has a sharper
sound than the latter when you swipe them at the same speed. As long as
standard cards alternate high and low density tracks it is an additional help
to position the head on the track.
The program accepts the following options, which normally you shouldn't
need to use except for track selection:
- -t <track> : Type of track to read, valid values are 1 to 4, default is
2. This option selects several parameters appropriated for each track, some of
which may be changed through other options. Values 1 to 3 correspond to the
three standard tracks and value 4 is experimental, to be used with non standard
tracks. Using this track 4 the program does not look for start and end sentinel
and it does not check parity and LRC. It also decodes the bits in a slightly
different manner than the standard: 0s are the same, but 1s are only one short
flux reversal, and not two short consecutive reversals like in the standard. I
found this non standard coding of bits in at least one card (photocopier card).
- -c <clk_bits> : Number of leading clocking bits, default value depends
on the selected track. This is the number of initial bits that are forced to be
0s (or 1s if -i option is given, see below) and their mean duration is used as
reference to decode the rest of the bits.
- -p <peak_points> : Minimum number of consecutive data points which a
data peak should have, default value depends on the selected track. This is to
avoid noise peaks, which are usually small, however a value too large may have
an undesirable effect because in the presence of abundant noise good data peaks
may not be found.
- -s <stop_points> : Minimum number of consecutive data points under noise
threshold (see below) before program stops taking data and starts decoding
bits. Default value is 500, which is around 10 milliseconds. Some non standard
cards have tracks with several records separated by a pause without data, you
may have to change this parameter if you find one of these cards with a big
pause.
- -l <threshold> : Minimum level of signal to be considered data, below
this value we consider it noise. Default is to use about the first 100
milliseconds of data (in which we expect no swipe yet) as a measure of the
noise level. With noisy sound cards it may be better to set threshold by hand
using this option. Don't use this option the first time you run my program and
pay attention to the value labeled 'noise mean' on screen (see example below),
if it is not zero it means there is a DC current and it might be enough to
erase your card while trying to read it. So better check this before reading
any card and if you find you have a DC current then add a capacitor in series
with the magnetic head to avoid it (see above). Note that you might have a DC
current even in case 'noise mean' is zero if the sound card amplifier is
capacitor coupled, so better check anyway using a voltmeter.
- -m <s|p|z> : Method to recognize bits, i.e. their start and end so that
their duration, and hence their nature, can be established. I developed first
the slope (s) method, then I moved to the newer peak (p) algorithm which I find
more robust and left the older method for historical reasons. There is a third
method, the zero crossing (z) algorithm, which I had to implement to decode cards recorded with my mobile. I don't know
why different amplifiers see magnetic stripes in a different way. If you have
problems reading cards with this program, first try to determine which method
works better with your sound card. Peak method (p) is the default.
- -d : Print raw data to stdout (to use the card as a digital oscilloscope)
which can be used with data analyzing tools to view what's going on, this helps
to find the coding scheme of non standard tracks. If you use this option you
will have to redirect output in order to save data.
- -b : Print decoded bits to stdout. Using this option you can count the
number of leading clocking bits. Next time you read that card you can use this
number for the clocking bits parameter, but it only makes sense if it is lower
than the default number or much higher. Setting the right number of clocking
bits improves the success rate in card decoding.
- -n : Don't stop decoding bytes after LRC. The program assumes that LRC is
the last byte of the data stream, but some cards like boarding passes have two
or three records separated by clocking bits.
- -i : Inverse clocking bits, they will be 1s instead of 0s. I found this non
standard behavior in at least one type of cards, Madrid Underground tickets.
- -x : Strict detection, by default data peaks are not required to be above
noise threshold, this level is only used to find out when data stream begins
and ends. This is done to avoid some clipping effects which sometimes happen
hiding true data peaks below threshold, specially if the latter is high.
However in the presence of abundant noise it may be convenient to use this
option to decrease the probability of taking noise peaks as data peaks. In
these conditions the use of the -p parameter may also help (see above).
Once you have read the track, on the screen will appear the bytes and some
informative data on the quality of the reading, you can use them to help to
position the head on the track (as well as by hearing sound), the higher the
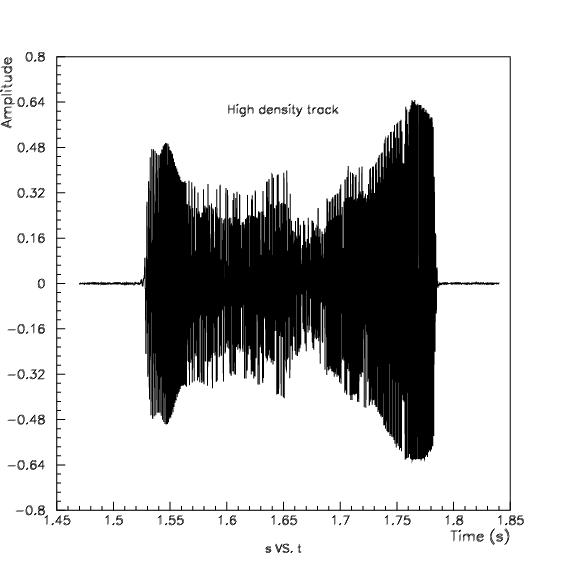
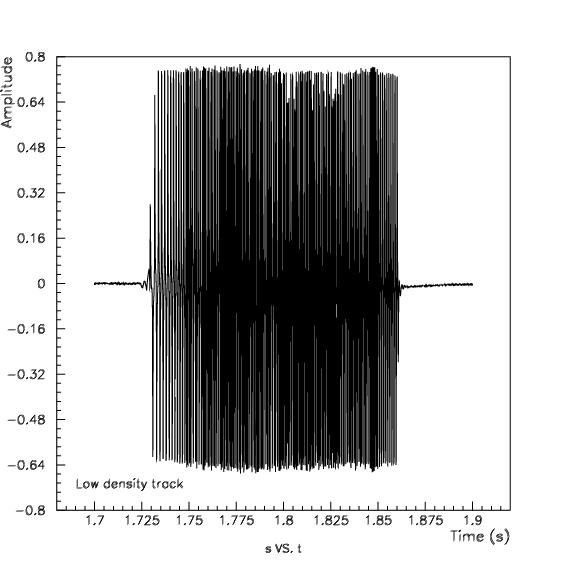
data max. and rms amplitudes, the better. I found that the optimum swipe time
is around 0.2 seconds for standard size low density tracks and around 0.4
seconds for high density ones. The swipe has to be as smooth and uniform as
possible, otherwise the program will wrongly interpret 0s as 1s and vice-versa.
Once you got the swiping rhythm you will read tracks at first swipe. In general
you should get familiar with the source code to know how it works. This would
help you to interpret the information shown on the screen after a swipe and
would let you modify the code to fit your particular requirements or in case
you find rare cards.
Some results
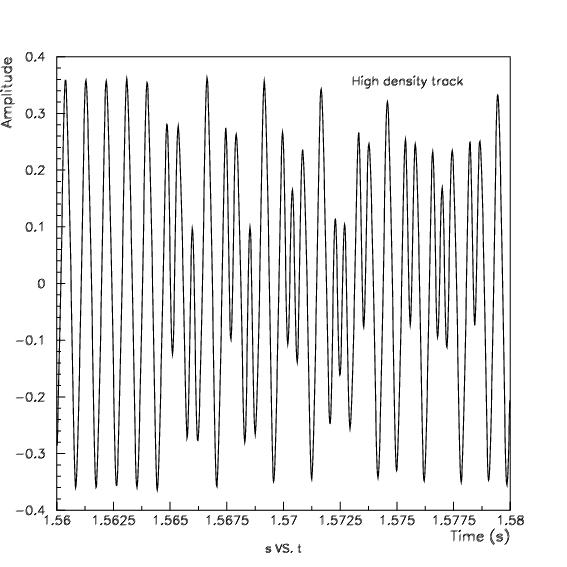
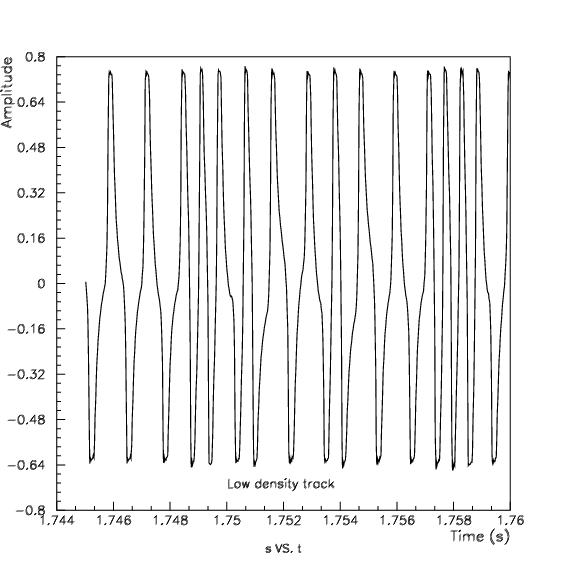
This is the aspect of a swipe (raw data) over the time for high and low
density tracks (click on images to enlarge):
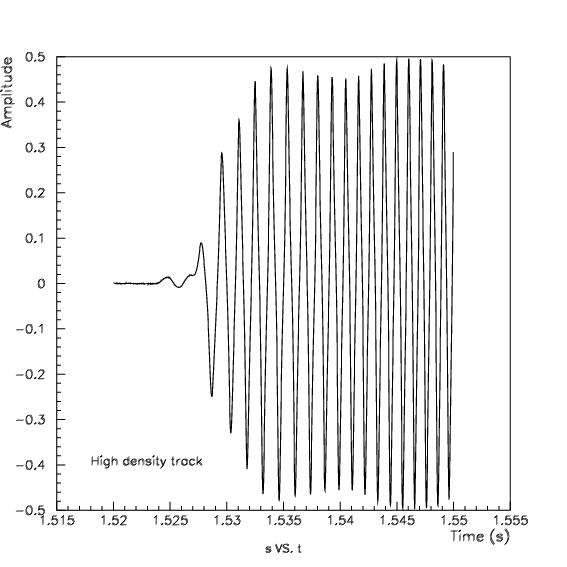
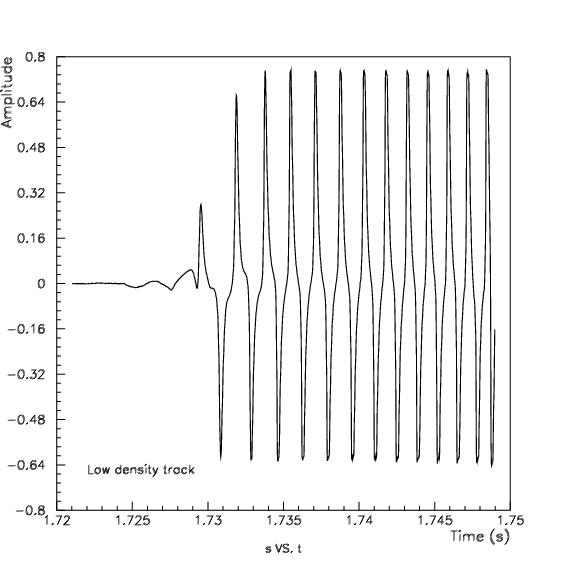
This is a closer look to the beginning of the data (leading clocking bits):
And these are the first data after the clocking bits (start sentinel):
These plots were generated using a data analysis tool called PAW from CERN, which you can download for
free (including a complete manual), and is available for many platforms
(including Windows). It you give it a try, this
macro would be helpful as well as this FORTRAN-like
function (needed by the macro) to decode rare cards.
To conclude, here is the output of the program (with -b -t 1 options) after
reading a standard IATA track (Spanair boarding pass):
Bad or no clocking bits parameter, using default: 60
Bad or no peak duration parameter, using default: 4
Bad or no stop duration parameter, using default: 500
No method parameter, using default: peak
Reading track 1
Bad or no threshold level parameter, using data...
Noise max./mean/rms amplitude: 0.003/0.000/0.001
Threshold: 0.012
Swipe time: 0.267 s
Data max./mean/rms amplitude: 0.628/-0.000/0.210
Bits: 490, individual duration: 0.545 ms
0000000000000000000000000000000000000000000000000000000000000000000000000000000000000000000000000000000000000101000111101100000001000000100000011100111000011111000100101010110101100000010001101100010101101000000001000000110110110000001010010110001011001100000000101001010000100101001000000010000001000000100000010000001000000100000010000001000000100000010000001000000100000010000001000000100000011111100110000100000000000000000000000000000000000000000000000000000000000000000000000000000000
Start sentinel found
%W   SPCJK 816  M 219 20E                ?
End sentinel found
LRC OK.
E-mail: padilla at
domain "gae ucm es" (my PGP/GPG public key)
First version: 27-Jan-2003, last update: 10-Dec-2009
This link: http://www.gae.ucm.es/~padilla/extrawork/soundtrack.html

 Go to the parent page: Magnetic stripe reader.


