As long as the smart cards and the parallel port of the PCs use the
same electrical levels, it is possible to make a direct connection, pin by
pin, between both devices. My personal approach was the following:
             DB-25S (female)                           ISO 7816-2

                                              ,-------------+-------------,
 13 12 11 10  9  8  7  6  5  4  3  2  1       |   1         |         5   |
_________________________________________     +-------\     |     /-------+
\ o  o  o  o  o  o  o  o  o  o  o  o  o /     |   2    +----+    +    6   |
 \ o  o  o  o  o  o  o  o  o  o  o  o  /      +--------|         |--------+
  \___________________________________/       |   3    +----+----+    7   |
  25 24 23 22 21 20 19 18 17 16 15 14         +-------/     |     \-------+
                                              |   4         |         8   |
                                              `-------------+-------------'


          Parallel port                              Smart card
     ---------------------                ---------------------------------

      pin  2 (Data bit 0)   ----------->   pin 1 (Vcc)
      pin  3 (Data bit 1)   ----------->   pin 2 (Write or Reset)*
      pin  4 (Data bit 2)   ----------->   pin 3 (Clock)
      pin  5 (Data bit 3)   ----------->   pin 4 (Reset or not connected)*
      pin 25 (Gnd)          ------------   pin 5 (Gnd)
      pin  6 (Data bit 4)   ----------->   pin 6 (Vpp or not connected)*
      pin 15 (Error)        <-----------   pin 7 (I/O)
      pin  7 (Data bit 5)   ----------->   pin 8 (Fuse or not connected)*


     * Depends on the smart card (generation, company, etc.). Other pins
could also change, but it is unlikely.
Note that with this scheme the smart card is electrically fed with one
of the data pins of the parallel port. There is no problem with this
because the power consumption of the smart card is very low.
Note also that with this scheme you cannot write to smart cards which
need Vpp higher than +5 volts. Many cards require a programming voltage of
+21 volts to be written. If you want to write to them you should modify the
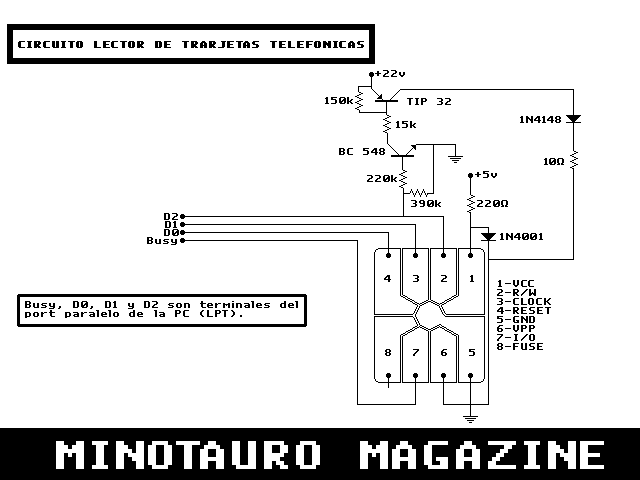
design in a way similar to the next figure, which a I took from the
Minotauro magazine. Note that my scheme and this one are different, I
include the figure as a guideline only.
The most difficult thing to do is the interface device, that is, the
device where you insert the card and physically makes the electric contact
between the smart card and the parallel port. You can either buy one (if
you know where) or to make one yourself.
You can make your own interface device in the following way. Cut a
piece of rigid plastic or cardboard the same size of a smart card. Cut it
by half into two pieces (cut perpendicularly to the longest side). One
piece goes on top of the other one and the smart card to be read will be
inserted between both pieces (side with the chip going inwards). The three
parts should be aligned. Now make a hole in one of the pieces such that the
contacts of the chip of the smart card to be read appear clearly through
the hole. Cover the hole with transparent and thin (but rigid) plastic by
the side of the piece in contact with the chip. Now you should see the chip
through the hole covered with transparent plastic. Mark in this plastic the
position of the contacts with a needle. Make two marks per contact, one at
each end. Once you have made the marks remove the smart card and convert
the marks into holes with the needle. Now introduce a thin cable through
these holes, one cable per contact. First introduce the cable from up to
down through one of the holes of the contact, then introduce the cable from
down to up through the other hole. Twist the outgoing end of the cable with
the rest of the cable. Done this way the part of the cable by the side of
the card should run parallel to the contact of the chip. Do it for the
eight contacts and solder the cables to a DB-25P (male) connector following
the scheme above. The only remaining thing to do is to tight both pieces
together with adhesive tape. Don't forget to keep all parts aligned during
all this process.
To use the interface device you have only to introduce the smart card
between both pieces. If the device has been correctly made you should see
the chip of the smart card to be read through the hole and therefore you
can move a little bit the card until it gets properly in contact with all
the cables. Plug the DB-25P (male) into the parallel port of your PC and
run the program to read/write the smart card. It is advisable to run the
program prior to the insertion of the card to be sure that the parallel
port has low level in all of its lines.
This interface device is stable and relatively robust, however it is
just one of the many approaches you can choose. Simply use your imagination
and improvise to get your own device.
It is interesting to explore smart cards not only to satisfy curiosity
and to have some fun. Is is possible to use them in serious applications,
for example, phone cards have a unique serial number which cannot be
modified and some random data which can be modified. This feature can be
used to control the access to a room or a computer, to store a key which
codes and decodes data, etc. Think a little bit and you may find your own
application for used smart cards which people have thrown away.
E-mail: padilla at
domain "gae ucm es" (my PGP/GPG public key)
First version: 27-Dec-1996, last update: 12-Dec-2002
This link: http://www.gae.ucm.es/~padilla/extrawork/pcsmart.html

 Go to the parent page: PC-smart card interface.